|
Paint Brushes and Methods
Paint brushes should be kept in a purpose made tin (if in constant use) called a keeper, similar in size to a gallon tin cut in half with notches at each end to hold a length of (welding) wire to suspend the brushes in a solution of Turpentine, Linseed oil and Mineral Naphtha or as an alternative to Naphtha, Cellulose thinners. If storing brushes this way don't allow them to touch the base of keeper or tin as you will end up with a solidified mess at the tip of brush and congealed paint at the base of keeper. Misshapen brushes can be dipped in hot water to restore shape.
Usually paint brushes are cleaned in turpentine if oil based and water if emulsion, either way they should also be washed out in soap and water allowed to dry thoroughly and stored in a sealed plastic bag or container to prevent moths laying eggs and their grubs eating the bristle.
Paint Pots or Kettles. When pots have accumulated large amounts of hardened paint on the rim and heavy thick skins of paint stuck to the bottom. Simply burn them out by setting fire to the pots and when cool scrape out the dry paint flakes and wire brush the remainder. Finally to seal the loose bits of burnt paint left behind simply Shellac both sides of the pot, Resulting in a brand new clean paint pot ready for use.
Boiled Linseed oil is used in the manufacturing of synthetic or oil paints and "raw linseed oil" is used for treating various hard and soft woods. Boiled linseed oil dries faster than raw linseed and is generally added when paint has become thick due to solvent evaporation or if attempting to paint in direct sunlight. Raw linseed oil can be added but only in exceptional circumstances, an example would be to considerably slow down the drying process allowing paint a greater length of time to "flow out" particularly with modern day faster drying enamels.
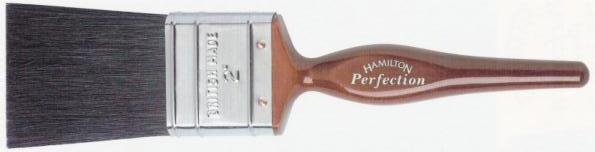
Paint brushes are unique if in the "Hamilton" range because they really are pure bristle unlike cheap brushes that claim to be but in fact are not. Hamilton brushes have barbles in the bristles and flags (split ends) at the tip to push and pull the paint over the surface evenly to provide a professional finish.
Paint brushes need to be fully worked or "broken-in" for best results, this can be achieved after painting a large area after which the bristles will no longer fall out of the ferrule.
In time the square edge of a brush will become rounded but the brush can still be used to maximum effect for many years.
Most painters prefer to use a worn brush rather than a brand new one and
painting a large area is one way to break in a new brush.
Cheap brushes contain a very small amount of pure bristle (if any) have no barbles or flags and slide over the paint without pushing or pulling leaving brush marks and a very poor finish thats liable to run or sag. Bristles need to be firm and have a great deal of spring for example, Holding the handle of a brush upright with bristles tips resting on a flat surface press the handle firmly down forcing the bristles to bend at 45 degrees then release pressure, the brush should immediately bounce back to the original position. This little test means the brush works for you, not you working for the brush.
Hamilton have been manufacturing paint brushes since 1746 so it goes without saying their reputation is unquestionable. Hamilton brushes are made from 100% pure black China bristle securely set in rubber with a stainless steel rust resistant ferrule and fastened with phosphor bronze pins.
| Pricing for Hamilton paint brushes |
| Hamilton Silver Range 1" £3.26 1½" £5.22 2" £8.41 3" £11.56 Hamilton Perfection Range ½" £3.51 ¾" £2.91 ¾" £2.36 Window or Sash brush (slanted edge) 1" £3.51 1½" £5.66 2" £9.74 2½" £13.90 3" £17.91 4" £18.16 Hamilton Namel-Var Range 1" £6.99 1½" £10.11 3" £23.80 Link to Hamilton Acorn Website (Prices include 17.5% VAT) Thanks go to Robinson & Neal Ltd (Now Brewers Decorating Centre) for providing pricing information. (Pricing not recently updated)
|
Basic Method
Firstly and most importantly you'll need to purchase a quality paint brush, Preferably one from the "Hamilton" range in the United Kingdom or "Purdy" in the United States.
Attempting to paint with a cheap brush will only result in a poor job as cheap brushes will not perform properly because they do not possess the properties or characteristics that the more expensive paint brushes do. Hamilton's paint brushes contain Horsehair, Camelhair Sable or China bristle depending on choice and are perfect brushes to achieve perfect results.
After preparing a surface ready for coach painting whether you've sprayed or brushed the panel previously with primer or undercoat and wet flatted ready for final application the following information should be useful.
(The following attempts to explain method of application in the simplest of terms:)
Imagine as a child you are playing with a toy aeroplane practising taking off and landing, you land on the runway taxi for a little way (on a table top say) then take off again, Repeating this operation on a suitably prepared surface teaches the user to understand how to lay the paint evenly with lighter pressure after each directional brush stroke. The brush is loaded with paint and you spread it over the surface in left to right up and down or criss-cross directions to achieve an even coat of paint, On the final lay off (you fly the aeroplane) gently in both directions decreasing pressure after each stroke (or landing) finally with just the weight of the brush itself pulled across on the very last stroke vertically.
How the paint performs when flowing out will depend on the quality as many modern paints dry far to quick actually creating brushmarks because they do not allow sufficient flowing out time. The better quality paints have less pigment and more oil striking the happy balance that can sometimes be problematic when choosing an unknown paint material. A heavy pigmented paint will cover well but the flow out property will be quite poor, On the other hand a heavy oil base and less pigmented paint will cover less yet flow out better.
(I know it's sounds daft but it's a reasonable way to describe the actual process)
Remembering to finish the laying off downwards or vertically not horizontally. This will allow brush marks if any to flow out and not build up and run. Laying off horizontally will allow the paint to build up and run.
Although not always recommended horizontal painting can be performed if an area has been poorly painted or badly built up with several layers of paint were the finish shows deep brushmarks (tram lines) spoiling the finish. Laying off paint in the opposite direction to these visible brushmarks will fill in the areas and help eliminate brushmarks. However the paint needs to be of sufficient quality with good flow out properties to achieve the best results.
Imagine a ploughed field on a steep hill with the furrows going up and down (vertically) allowing rain water to flow down the hill within the furrows. If the field was ploughed left and right (horizontally) the rain water would build up inside the furrows forcing them to collapse and run down hill.
Only in exceptional circumstances would you lay off in a horizontal way on straight vertical panels usually to fill in a very rough or poorly painted surface probably with undercoat then finally finishing off vertically. This eliminates brush marks created in the same direction that appear heavy or to deep to flat by hand.
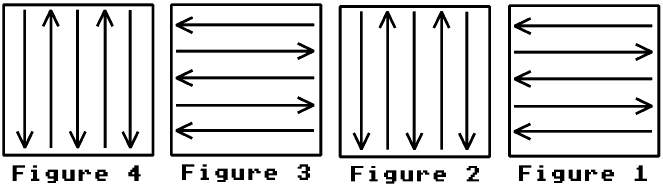
When attempting to brush paint a panel or series of panels the user should always start from the top right corner (if right handed) and work to the left, This helps to ensure the painted area remains untouched by body contact or through clothing etc, You should always work "away" from wet paint and not work "across" it.
The above diagram shows the correct method of how to layoff paint on one panel and displays "Four Sections" starting from the right laying off in "Figure 1 horizontally" then in "Figure 2 vertically" and "Figure 3 horizontally" ending in "Figure 4 vertically" each time applying slightly less pressure to the brush as you layoff the panel.
Depending on the type of paint, colour or pigment it may be only possible to apply the paint and layoff in one or two directions and not the four section layoff method. However many so called brush paints will not allow the user to layoff more than once or twice due to rapid solvents or driers and should be avoided if you require the best possible finish. Coach paint must dry slowly giving the painter plenty of time to brush the paint evenly and allow sufficient flowing out time, thus removing brushmarks.
Under exceptional circumstances were paint appears to dry faster than normal, additives can be simply added to either slow down or speed up the drying process.
Owatrol conditioner added to oil based paints and varnishes will "slow down" the drying process.
Terebine Driers added to oil based paints and varnishes will "speed up" the drying process.
A retarder like (Owatrol) will be required when attempting to paint in hot weather when paint pulls or drags because it's drying too quickly. An accelerator like (Terebine) is used in cold weather conditions where the drying process takes too long and may result in paint bloom.
A simple tip on how to remove those loose bristles appearing in the paint when using a new paint brush is to use the side tipped edge of a brush to scoop up the bristle then simply remove from the brush tip with your fingers.
When charging a brush with paint it is practical to dip the bristles into the paint by an inch or so only and then lightly press the bristles against the inner side of the paint pot to remove surplus paint and never wipe the brush over the lip of a paint tin. This will help to prevent paint from dripping down the outside of a paint pot or running down a brush ferrule and the user would then be able to paint a complete double decker bus using the same brush and paint pot without having paint dripping, It is commonplace to have absolutely no paint on your hands clothes or to accumulate anywhere else following this technique.
Linseed oil keeps the brushes supple, Cellulose thinners draws paint out of the stock which will solidify at the bottom of the tin keeping the brushes in pristine condition, White Spirit or Turpentine retards solvent evaporation.
Gallons of Turpentine or White Spirit can quite literally be used when repeatedly cleaning out paint brushes, so as a tip pour used dirty turps back into the original container add about 20% cellulose thinners (to draw the paint out the stock or ferrule) and allow to settle, After a few weeks the turps will become almost clear ready to be poured out and used again particularly for initial brush cleaning.
I can't emphasise enough on the importance of brush cleanliness and maintenance that will prolong brush life and help keep paintwork free from contaminants.
Brush cleaning is probably best done by pouring clean Turpentine or White Spirit into a suitable container, (I use the large type of baked beans tins) clean brush and pour out turps, add clean turps, clean brush pour out turps repeat this process until no discolouration is evident in the turps. When satisfied with the cleaning process and if you are not likely to use the brush for a considerable time wash out thoroughly in soap and water, allow to dry and store in a sealed container to protect from dust, moths etc.
(I always have a couple of containers holding Turpentine in various levels of settlement to avoid wastage)
Small holes should be drilled through the handle base (near the ferrule) so the brushes can then be suspended on wire. paint brushes not in constant use should be washed in soap and water and allowed to dry before storage.
Top Tip never allow a brush to become hard it will then require copious amounts of brush restorer to clean, Paint remover destroys the firmness of the brush. If short on time wrap the brush in cling film or submerge in water when finished then clean the following day.